

These curly girlies absolutely love wearing skirts and dresses, which definitely suites their fun-loving girlie personalities. I have tried several times to encourage them to wear little shorts to the playground, but they refuse, they only want to wear bright twirly skirts.


So, after many months of a sewing hiatus, I am back to plugging away at the sewing machine, making skirts and little play dresses for the girlies!
I'm excited to present this, as it is my first sewing tutorial on this blog. I saw a dress like this a few weeks ago at Target selling for $15.99 and I knew that I could make the same thing for much cheaper. I'm calling this the Ruffle T-Shirt Dress:

This is such an easy project! It takes only a small amount of fabric and a simple little girlie tee. The best part, which I phrase in stay-at-home-mom terminology, is that you can complete the entire project in just one little rest time!

So, if you have about 12 inches of fabric laying around, an old tee that doesn't quite fit like it used to, and about 2 hours, then you have got yourself a great little play dress for your favorite girlie!

See below for the full tutorial!
Tutorial: The Ruffle T-shirt Dress 
Materials: 1/2 yard fabric
t-shirt
coordinating thread
fashion pin
buttons
Sizing:
t-shirt
coordinating thread
fashion pin
buttons
Sizing:
Size 2T, with total length measuring 18 inches (12 inches of shirt/torso and 6 inches of skirt):
Cut one piece 25 X 3 inches
Cut one piece 25 X 6 inches
Cut one piece 25 X 3 inches
Cut one piece 25 X 6 inches
**My two year old is about 36 inches long and it fit just right - so you may want to add a little more to the length of the skirt depending on the height of your daughter.
Size 3T, with total length measuring 20 inches (14 inches of shirt and 6 inches of skirt):
Cut one piece 25 X 4 inches
Cut one piece 25 X 7 inches
1. Prepare material Cut out pieces of fabric and iron:

Hem edges of both of the fabric pieces by folding under 1/8" then another 1/4"and ironing: Sew into place:
 2. Gather Material to make the ruffles
To gather the fabric, set the sewing machine from the normal stitch size to a larger stitch:
 AND set the machine to the strongest tension setting (this causes the thread to work harder, thus gathering the fabric):
 Without making a stay stitch, sew a straight line along the opposite edge of the hemmed fabric, about 1/4 inch from the edge:
**If this is your first time gathering, you may want to practice on some scrap fabric.
 As you sew, you will begin to see the fabric gathering:
 When finished gathering, be sure to pull off a fair amount of thread at the end of your stitching so that you can adjust the gathering. Gather both pieces of fabric. Lay the gathered pieces around the t-shirt and adjust the gathering, making sure that they are the same length:
 If the skirt pieces are too long or too short, adjust the gathering by shifting the gathers and letting some in or pulling some out:
 3. Sewing
Line up the side seams of the two ruffles and pin together:
 Pin the smaller-sized ruffle onto the top of the larger-sized ruffle, making sure the hem of the larger ruffle measures 3 inches from the hem of the smaller-sized ruffle, all the way around the skirt:
 Sew the two ruffles together (After several trial runs, hence the change of the fabric in these pictures, I realized that doing this first makes it much easier to sew the ruffles onto the shirt.):
 This is what the two sewn ruffle pieces will look like:
 Lay the right side of the ruffles on top of the right side of the t-shirt. Line up the side seams of the ruffles to the side seams of the t-shirt (don't pin yet - despite the picture):
 Be sure to line up the ruffles slightly above the bottom seam of the t-shirt so that the hem line will not show on the dress. Pin ruffles to the shirt:
 Sew the ruffles to the t-shirt with a 1/2 inch seam so that the gathering stitch does not show:
 TAKE YOUR TIME AND SEW SLOWLY! Check back at your stitching often to make sure that the gathering stitch is not showing:
Cut one piece 25 X 4 inches
Cut one piece 25 X 7 inches
1. Prepare material Cut out pieces of fabric and iron:

Hem edges of both of the fabric pieces by folding under 1/8" then another 1/4"and ironing:
 Sew into place:
  2. Gather Material to make the ruffles
 To gather the fabric, set the sewing machine from the normal stitch size to a larger stitch:
AND set the machine to the strongest tension setting (this causes the thread to work harder, thus gathering the fabric): Without making a stay stitch, sew a straight line along the opposite edge of the hemmed fabric, about 1/4 inch from the edge: **If this is your first time gathering, you may want to practice on some scrap fabric.
 As you sew, you will begin to see the fabric gathering:
 When finished gathering, be sure to pull off a fair amount of thread at the end of your stitching so that you can adjust the gathering. Gather both pieces of fabric. Lay the gathered pieces around the t-shirt and adjust the gathering, making sure that they are the same length: If the skirt pieces are too long or too short, adjust the gathering by shifting the gathers and letting some in or pulling some out: 3. Sewing
 Line up the side seams of the two ruffles and pin together:
 Pin the smaller-sized ruffle onto the top of the larger-sized ruffle, making sure the hem of the larger ruffle measures 3 inches from the hem of the smaller-sized ruffle, all the way around the skirt:Sew the two ruffles together (After several trial runs, hence the change of the fabric in these pictures, I realized that doing this first makes it much easier to sew the ruffles onto the shirt.):This is what the two sewn ruffle pieces will look like: Lay the right side of the ruffles on top of the right side of the t-shirt. Line up the side seams of the ruffles to the side seams of the t-shirt (don't pin yet - despite the picture):Be sure to line up the ruffles slightly above the bottom seam of the t-shirt so that the hem line will not show on the dress. Pin ruffles to the shirt:Sew the ruffles to the t-shirt with a 1/2 inch seam so that the gathering stitch does not show:
 TAKE YOUR TIME AND SEW SLOWLY! Check back at your stitching often to make sure that the gathering stitch is not showing:

Cut fabric anywhere from 1 inch to 2 inches, depending on how big or small you want the flower:
 The flower in this tutorial was made from 1 inch of fabric. The pink flower on the purple t-shirt dress used 1 1/2 inches of fabric.
2. Fray Check (can be found at most craft stores) the ends of the fabric to prevent fraying: 3. Thread a needle with coordinating thread, tie a knot at the end of the thread, and make a loose hand-stitch all the way down the fabric:
 The material will begin to gather:

 4. When fabric has reached the end, take the needle and go through the first three or four gathers so to connect the end of the fabric flower to the beginning:
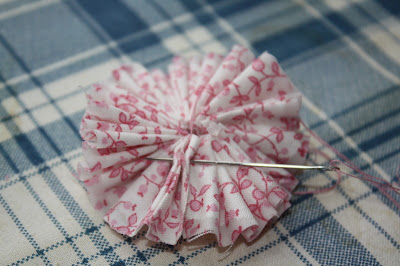 Do the same at the top of the fabric as well for securing purposes:
  5. Take the thread through the middle of the flower and stitch through a few more gathers on the back side:
 Cut thread and tie off with a knot:
 6. This is where you may add some of your own creativity to the flower.
Using a button cover kit (can be purchased at craft stores):
 Make a fabric button using the same fabric or a coordinating fabric:

 Sew a button or two onto the flower:


7. Attach the flower to a fashion pin with a hot glue gun:
 8. Attach the pin to the dress and you are done!
 The flower in this tutorial was made from 1 inch of fabric. The pink flower on the purple t-shirt dress used 1 1/2 inches of fabric.
 2. Fray Check (can be found at most craft stores) the ends of the fabric to prevent fraying:
 3. Thread a needle with coordinating thread, tie a knot at the end of the thread, and make a loose hand-stitch all the way down the fabric:
  The material will begin to gather:
 4. When fabric has reached the end, take the needle and go through the first three or four gathers so to connect the end of the fabric flower to the beginning:
  Do the same at the top of the fabric as well for securing purposes:
  5. Take the thread through the middle of the flower and stitch through a few more gathers on the back side:
 Cut thread and tie off with a knot:
  6. This is where you may add some of your own creativity to the flower.
Using a button cover kit (can be purchased at craft stores):
Make a fabric button using the same fabric or a coordinating fabric: And attach to the flower:
 Sew a button or two onto the flower:
You can also make two different sized flowers and attach them to each other.
7. Attach the flower to a fashion pin with a hot glue gun:
 8. Attach the pin to the dress and you are done!
Cute,cute! Can't wait to see in person. Tutorial seems easy to follow. Whose that movie star behind the foster grant sunglasses?
ReplyDeleteCan't wait to make one of these! :)
ReplyDeleteThose dresses are too cute!! Can't wait to see those cute little models in person!
ReplyDelete